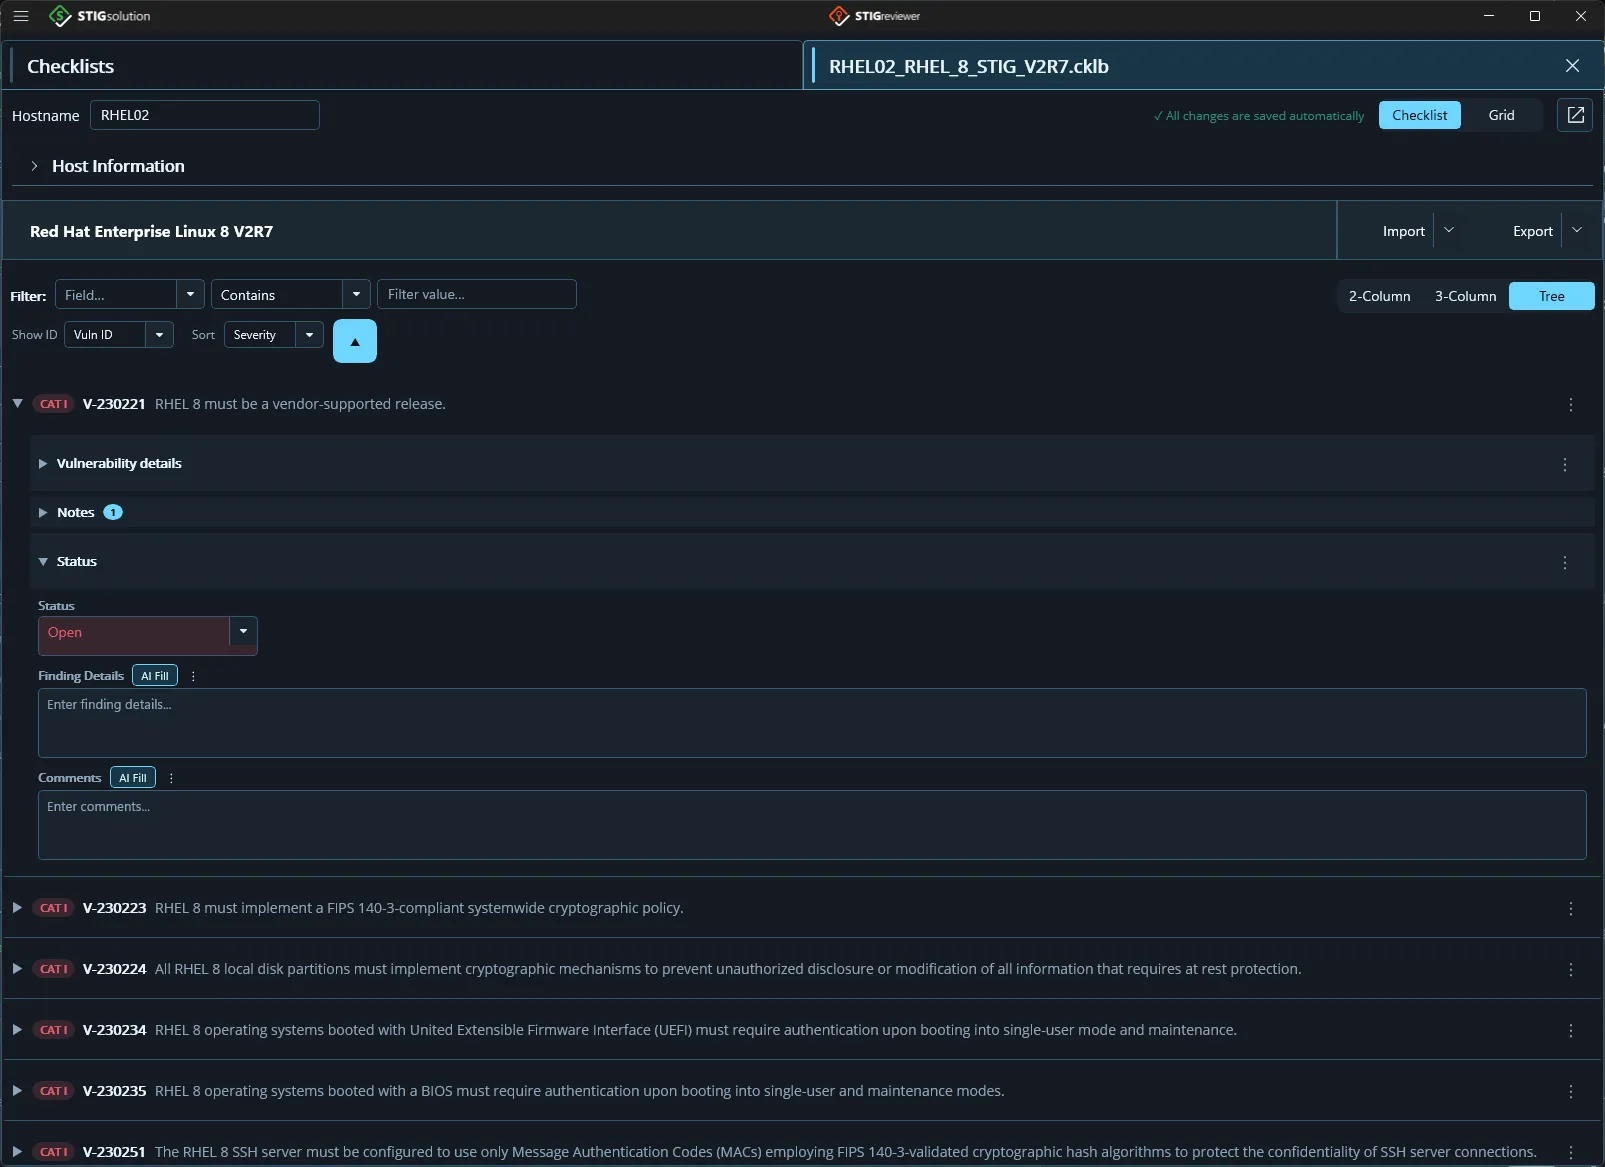
The Checklist view
Form mode is the default view when you open a checklist. It is divided into resizable panes by drag bars (grid splitters). By default you see two panes: the items grid on the left and a stacked detail panel on the right. At the top of the page there is a persistent bar with three controls: the Quick Filter bar (described below), a 2-Column / 3-Column / Tree segmented control that switches between three overall layouts — a 2-column form layout, a 3-column form layout for wider screens, and the Tree view that groups items hierarchically (see “Tree view” below) — and a ⋮ button that chooses which detail sections are shown.
Choosing which sections are shown
Section titled “Choosing which sections are shown”The detail pane can show a lot of information, and not everyone needs all of it. Click the ⋮ button at the right end of the top bar (tooltip “Choose which detail sections are shown”) to open a “Show sections” panel with a checkbox for each optional section:
Notes, Answer File, Discussion, Check, Fix, References
All six are turned on by default, and your choice is remembered. Finding Status, Finding Details, and Comments are always shown — those are the fields you edit, so they cannot be hidden. This setting applies to both the 2-Column and 3-Column layouts. The Tree view has its own equivalent on each row’s ⋮ menu.
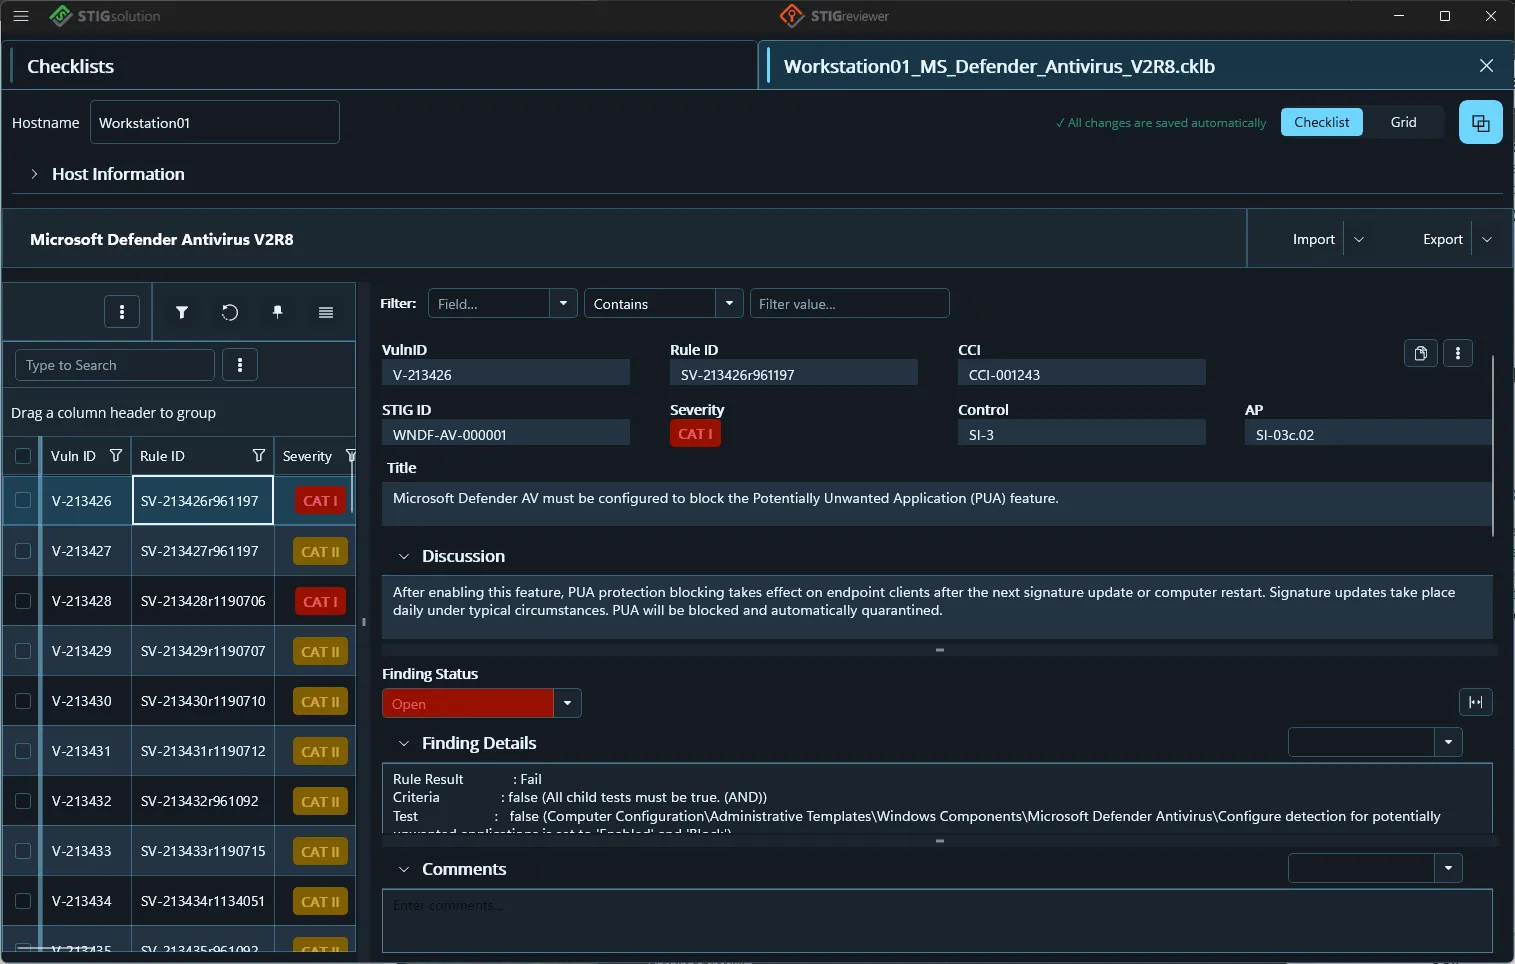
The items grid
Section titled “The items grid”The grid on the left lists every requirement in the checklist. The default columns are:
-
Checkbox — select items for bulk update.
-
STIG — only shown when the checklist contains more than one STIG.
-
Vuln ID.
-
Severity — a colored pill (CAT I, II, or III).
-
Rule ID.
-
STIG ID.
-
Title.
-
Status — a colored pill: Not Reviewed, Open, Not Applicable, or Not A Finding.
-
CCI.
-
Control Family, Control, AP, rev4AP.
-
Revised — yes/no, from the loaded STIG Revisions file.
-
In eMASS POA&M? — yes/no, from the loaded POA&M file.
The same toolbar conventions as the inventory grid apply: select rows for bulk update, use Clear Filters / Reset Grid / Freeze Columns / Column Chooser on the right.
The Quick Filter bar
Section titled “The Quick Filter bar”Across the top of the Checklist view is a persistent Quick Filter bar. It applies whether you are in 2-Column, 3-Column, or Tree mode. The bar lets you narrow the items list using a single, focused rule. It is in addition to the per-column filters in the grid — use whichever is easier for the question you are trying to answer.
The bar has four parts:
-
Field — pick the field you want to search in. The list includes All Fields and individual fields like Vuln ID, Severity, Status, Finding Details, Comments, Hostname, and Host IP.
-
Condition — pick how the field should be matched (for example, contains, equals).
-
Value — type what you are looking for. The grid filters as you type.
-
✕ Clear filter — appears only when a filter is active. Click it to clear the filter and show all items again.
The detail pane
Section titled “The detail pane”Select an item in the grid and its full information appears in the detail pane on the right.
Read-only fields
Section titled “Read-only fields”At the top of the detail pane you can see the Vuln ID, Rule ID, CCI, STIG ID, Severity, Severity Override (and Override Reason if set), Control, and AP — all populated from the STIG. Below that, the Title is shown as a read-only label, and the long-form text from the STIG is grouped into expanders: Discussion, Check, Fix, Revision (when present), and References.
When the Check or Fix text contains commands you would run on the target system, STIGreviewer pulls them out and shows them as clickable chips at the top of that expander. Click a chip to copy that command to the clipboard so you can paste it straight into a terminal or remote session — no need to select the text by hand out of a wall of instructions.
Editable fields
Section titled “Editable fields”At the bottom of the detail pane are the three fields you can edit on each item:
-
Finding Status — pick from Not Reviewed, Open, Not Applicable, or Not A Finding. Each option is color-coded.
-
Finding Details — a rich-text area for your finding write-up.
-
Comments — a rich-text area for additional notes.
Every change autosaves to the source CKL or CKLB file.
Severity Override
Section titled “Severity Override”Severity Override lets you raise or lower the severity assigned to a finding. This is a sensitive setting:
-
If Enable Severity Override is on in Business Rules, you can change the Severity Override dropdown and enter an Override Reason.
-
If Allow Severity Override in checklists is off in Business Rules, every item that uses Severity Override will show up as a Severity Override Issue in the Issue Summary, and a warning banner appears at the top of the editor.
Notes on this item
Section titled “Notes on this item”The detail pane includes a Notes expander that lets you keep working notes attached to the currently selected check. The expander header shows the word Notes and a small badge with the current note count.
Notes are stored in an external file so they can be shared or reused across checklists. Inside the Notes panel you will find:
-
Open and New buttons for the target notes file.
-
A target-file drop-down showing the notes file currently being used.
-
A list of notes for this item, and a rich-text editor for adding or editing a note.
Notes travel with the item: the same Notes panel is available in the Grid view (in the drawer’s Notes tab) and in the Tree view.
When you have configured an AI provider (see chapter 16), a small AI button appears next to the Add and Cancel buttons in the note-draft area. Clicking it opens a small “Generate note with AI” popup with two ways to build the request:
-
Saved prompt — pick one of the prompts from your AI Prompt library.
-
One-off prompt — type a prompt inline for a single use. Tokens such as {VulnID}, {Title}, and {CheckText} are supported here as well. If both fields are set, the one-off prompt wins.
Click Generate and STIGreviewer will drop the AI response into the note-draft editor. Review it, edit if you like, and press Add to save the note. Nothing is written to the notes file until you click Add.
Tree view
Section titled “Tree view”Tree view is a third layout you can pick from the 2-Column / 3-Column / Tree segmented control at the top of the Checklist view. Instead of a flat list, items are grouped hierarchically and displayed as expandable rows.
Each row shows a chevron, a colored severity pill, an identifier (choose Vuln ID, Rule ID, or STIG ID with the Show ID picker in the toolbar), a title, and a kebab (⋮) menu for row actions. Above the tree, the toolbar has:
-
Show ID — pick which identifier appears on each row.
-
Sort — pick a field to sort by, plus a toggle for ascending / descending.
Expand a row and you get these sections inside it:
-
Vulnerability details — the same read-only fields as the Checklist view: Vuln ID, Rule ID, STIG ID, Control, AP, CCI, Discussion, Check, Fix, and Revision.
-
Notes — the same notes panel as in the Checklist view.
-
Status — edit the finding’s Status, Finding Details, and Comments in-line.
-
Answer File — the Evaluate-STIG answer file panel for this check, with a badge showing how many answers exist. Collapsed, it summarizes as “N answer(s) in the open answer files.” See chapter 11.
Each row also has a ⋮ menu that controls which of these sections appear on that row — Vulnerability details, Notes, Answer File, and Status can each be turned on or off, and your choice is remembered.
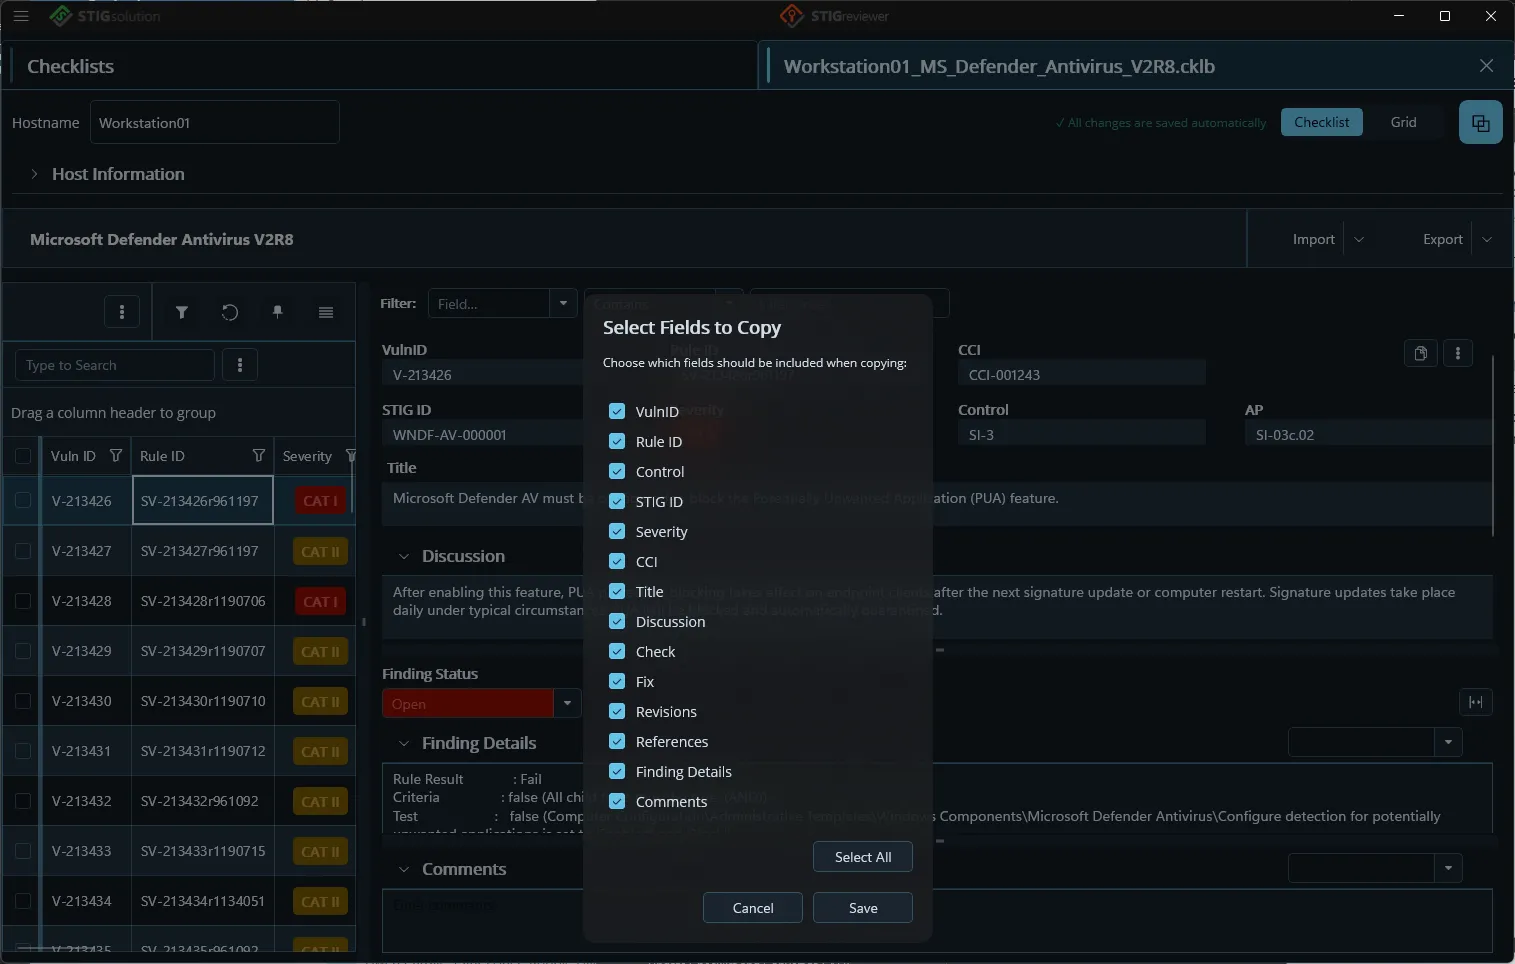
Copying vulnerability information
Section titled “Copying vulnerability information”Two small icon buttons sit next to the read-only fields in the detail pane:
-
📋 Copy Vulnerability Information to Clipboard — copies the selected fields for the current item so you can paste them into another tool.
-
⚙ Copy Settings — opens the Select Fields to Copy popup. Tick the fields you want included in the copy and click Save. STIGreviewer remembers your selection.
When clicked, vulnerability information for the selected item will be copied to the clipboard. From there, it can be copied anywhere else to share that findings information.