AI assistance
STIGreviewer can connect to an AI provider to help you draft Finding Details, Comments, and per-check Notes. The AI features are opt-in — every AI Fill button, the “Generate note with AI” button on the Notes panel, and the Fill with AI tab in the Bulk Update popup only appear once you have connected a provider on the AI Settings page.
Nothing generated by the AI is written to a checklist or notes file automatically — you always click Add, Apply, or accept the response yourself. The one exception is the optional “Fill Finding Details automatically when Status changes” setting described below.
Connecting to a provider
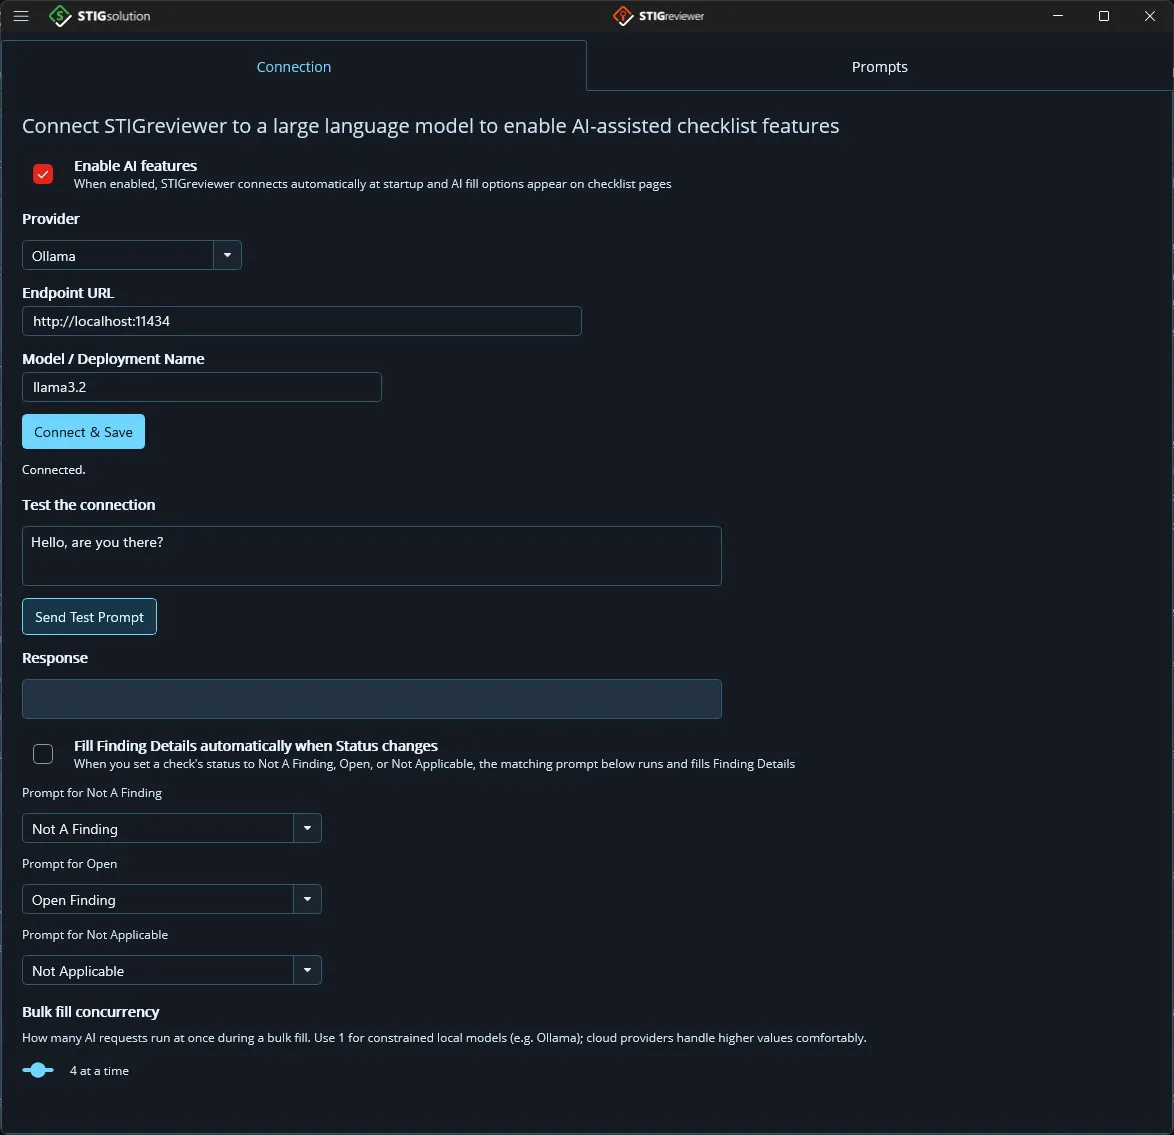
Section titled “Connecting to a provider”Open AI Settings from the flyout. The page has two tabs: Connection and Prompts. Start on Connection:
-
Turn on the “Enable AI features” checkbox. This is the master switch. When it is off, STIGreviewer disconnects and every AI Fill button, the AI button on the Notes panel, and the Fill with AI tab hide themselves.
-
Pick a Provider. Supported options are OpenAI, Azure OpenAI, Ollama (local models), and Claude (Anthropic).
-
Enter the Endpoint URL (only shown for Azure OpenAI and Ollama). Azure looks like https://your-resource.openai.azure.com/ and Ollama typically runs at http://localhost:11434.
-
Paste your API Key (hidden for Ollama, which does not need one). The key is stored in your operating system’s secure storage, not in the plain application settings.
-
Type a Model or Deployment Name (for example, gpt-4o, claude-sonnet-4-5, llama3.1). For Azure this is your deployment name; for the other providers it is the model identifier.
-
Click Connect & Save. The status message underneath tells you whether the connection succeeded, and a busy indicator shows while it’s in flight.
Below the connection form is a “Test the connection” section. Type a short question (the default is “Hello, are you there?”), click Send Test Prompt, and the response appears in the box underneath. Use this if the AI Fill buttons ever seem to hang — it gives you a quick, low-cost round-trip against the same credentials.
Setting up Ollama (local AI)
Section titled “Setting up Ollama (local AI)”Ollama is a free application that lets STIGreviewer talk to an AI model running directly on your computer, without sending anything to the cloud. It is a good fit if your organization does not allow AI data to leave the network, if you want to work offline, or if you would rather not pay per request for a cloud provider.
The trade-off is that responses are as fast (or as slow) as your own computer, and larger models take a lot of memory. On a laptop with 16 GB of RAM, an 8-billion-parameter model such as llama3.1 is a reasonable starting point.
Step 1 — Download and install Ollama
Section titled “Step 1 — Download and install Ollama”-
Open a web browser and go to ollama.com. Click the Download button.
-
Choose the installer for your operating system (Windows, macOS, or Linux).
-
Run the installer and follow the on-screen steps. On Windows it walks through a standard installer wizard; on macOS drag the Ollama app into the Applications folder and open it once so it can register itself.
-
After the install finishes, Ollama runs in the background. On Windows you will see a small Ollama icon in the system tray (bottom right, near the clock). On macOS it appears in the menu bar (top right). Leave it running — STIGreviewer connects to it while it is running.
-
Verify Ollama is running by opening a web browser and going to http://localhost:11434. If everything is working you will see a small page that says “Ollama is running.”
Step 2 — Download a model
Section titled “Step 2 — Download a model”Ollama can run a lot of different open-weight AI models, but you need to download the specific model you want to use before STIGreviewer can talk to it. Models are pulled from the command line:
-
Open a terminal. On Windows press the Windows key, type PowerShell, and press Enter. On macOS press Command-Space, type Terminal, and press Enter.
-
Type the following and press Enter:
ollama pull llama3.1
- Wait for the download to finish. Models are typically several gigabytes; llama3.1 is about 4.7 GB. You only need to do this once per model.
Some models that work well for STIG-style Finding Details writing, from smallest to largest:
-
phi3 — about 2.3 GB. Fastest and lightest. Good for short, direct answers on modest hardware.
-
llama3.1 — about 4.7 GB. Good balance of quality and speed. Recommended starting point on 16 GB machines.
-
mistral — about 4.1 GB. Alternative to llama3.1 with slightly different writing style.
-
llama3.1:70b — about 40 GB. Highest quality output in this list, but only usable on a workstation with a lot of memory and (ideally) a GPU.
You can see the full model catalog at ollama.com/library. Whatever name you pass to ollama pull is the exact string you will type into the Model box on the AI Settings page.
Step 3 — Test the model (optional)
Section titled “Step 3 — Test the model (optional)”Before you switch to STIGreviewer, you can confirm the model is working from the terminal:
ollama run llama3.1
Type “Hello” and press Enter. The model should reply. Type /bye and press Enter to exit.
Step 4 — Connect STIGreviewer to Ollama
Section titled “Step 4 — Connect STIGreviewer to Ollama”Open AI Settings from the flyout and fill in the Connection tab with these exact values:
-
Enable AI features — checked.
-
Provider — Ollama.
-
Endpoint URL http://localhost:11434 (this is the default; only change it if you moved Ollama to another machine).
-
API Key — leave blank. Ollama does not require one.
-
Model — the exact name you pulled, for example llama3.1. Spelling and case matter.
Click Connect & Save. Then use the Send Test Prompt button underneath to make sure a real request comes back.
Recommended settings for Ollama
Section titled “Recommended settings for Ollama”-
Set Bulk fill concurrency to 1 (or 2 on a very capable workstation) using the − button on the spinner. Local models can only run one request at a time on most hardware; higher values will queue up and slow the whole batch down instead of finishing faster.
-
Leave the Auto-fill on status change setting off until you know how fast your model is on your hardware. Ollama is often several seconds per response, which can feel slow when it happens on every click.
-
Keep Ollama running in the background whenever you use STIGreviewer’s AI features. If you quit Ollama from the tray/menu bar, STIGreviewer will lose the connection and you will need to reopen Ollama.
Troubleshooting
Section titled “Troubleshooting”-
“Connection failed” on Connect & Save. Open http://localhost:11434 in a browser. If you don’t see “Ollama is running,” open Ollama from the system tray or menu bar (or from your Start menu / Applications folder) and try again. If the browser page loads but STIGreviewer still fails, double-check that the Model box on the AI Settings page matches a model you have pulled — run ollama list in a terminal to see what is installed.
-
Responses are very slow. The first request after Ollama starts is always slower because the model has to load into memory. If it stays slow after that, try a smaller model (phi3 instead of llama3.1). Closing other memory-heavy applications also helps.
-
Model download stalls or fails. Some corporate networks block the endpoints Ollama uses to download models. If ollama pull stops making progress, retry on a different network or ask your IT team to whitelist ollama.com.
-
Output looks generic or wrong. Local models are usually smaller than cloud models, so the writing quality is different. Try a larger model, revise the prompt on the Prompts tab to be more specific, or add more context fields to the prompt.
Auto-fill on status change
Section titled “Auto-fill on status change”Below the connection form there is a checkbox labeled “Fill Finding Details automatically when Status changes.” When this is on, STIGreviewer will run a prompt in the background as soon as you change a check’s status to Not A Finding, Open, or Not Applicable, and drop the AI response straight into Finding Details.
Three prompt pickers underneath let you choose which prompt is used for each of the three statuses. The prompts themselves live on the Prompts tab (see below).
Bulk fill concurrency
Section titled “Bulk fill concurrency”The Connection tab also has a numeric spinner labeled “Bulk fill concurrency” that controls how many AI requests run at once when you use the Fill with AI tab of the Bulk Update popup. Use the + and − buttons to set a value between 1 and 8; the default is 4. Use 1 for local models on a laptop (for example, Ollama). Cloud providers typically handle higher values comfortably.
Managing prompts
Section titled “Managing prompts”Switch to the Prompts tab. Your prompt library appears in a list on the left with each prompt’s Name and a short preview. Each row has a Delete button.
Above the list are two buttons: New (create a fresh prompt) and Restore Defaults (recreates the three built-in prompts: Not A Finding, Open Finding, and Not Applicable). On the right is the prompt editor with a Name entry, a prompt-text editor, and a Save button.
Prompts can include tokens that STIGreviewer replaces with the current check’s data before sending. Supported tokens:
{VulnID}, {RuleID}, {StigID}, {Severity}, {Title}, {Discussion}, {CheckText}, {FixText}, {CCI}, {Control}, {AP}, {Status}, {FindingDetails}, {Comments}, {Notes}
Your prompt library is saved as a JSON file in your application data folder, so you can back it up or copy it between machines.
Using AI from the checklist views
Section titled “Using AI from the checklist views”Once you are connected, the AI Fill buttons appear next to the Finding Details and Comments editors in every editor surface: the Checklist view, the Grid view drawer, and the per-row expanders in Tree view.
-
AI Fill — runs the linked prompt against the currently selected check and replaces the field with the response.
-
The three-dots menu next to AI Fill — opens the Prompt Link Picker so you can choose which library prompt this button uses. The Finding Details three-dots menu also hosts the “Auto-fill on status change” switch; turn it on there and the AI Fill button will run whichever per-status prompt is configured on the AI Settings page.
The AI button on the Notes panel is described in chapter 7 (Notes on this item). The Fill with AI tab of the Bulk Update popup is described in chapter 9.