The checklist inventory
The inventory grid on the Checklists page is much more than a list of files. It tells you the status of every loaded checklist and gives you a place to take action on many checklists at once.
The Issue Summary banner
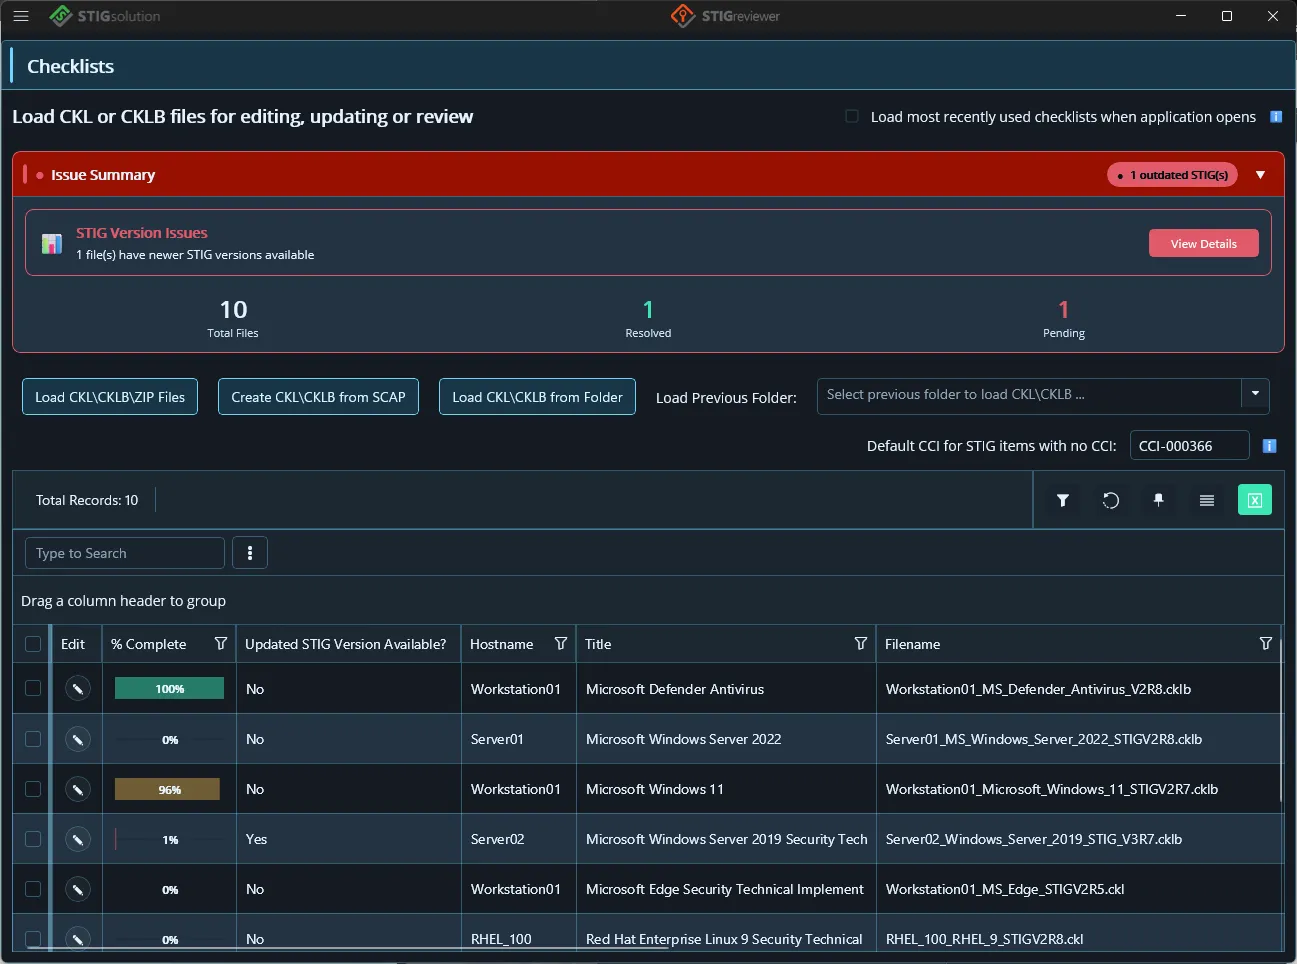
Section titled “The Issue Summary banner”Just below the page header sits the Issue Summary banner. The banner has a colored border that tells you, at a glance, the health of your loaded checklists:
-
Green — All Clear. No issues detected.
-
Amber — warnings (for example, missing host information or severity overrides).
-
Red — errors (for example, outdated STIG versions or STIGs that are not in your STIG Library).
Click the expand button to open the details panel. You will see one or more cards, only those that are relevant:
-
STIG Version Issues — one or more loaded checklists are built on an outdated STIG. Click View Details to see which ones.
-
Host Information Issues — one or more checklists are missing required host fields. Click Review to see exactly which fields are missing on which hosts.
-
Severity Override Issues — one or more checklists have a Severity Override set, but your Business Rules don’t allow them. Click View Details to see which items.
-
STIG Library Issues — one or more checklists use a STIG that is not loaded into your STIG Library. Click View Details to see which ones.
At the bottom of the panel you can see three counters: Total Files, Resolved, and Pending.
Reading the inventory grid
Section titled “Reading the inventory grid”Each row in the inventory grid represents a single loaded checklist. The default columns are:
-
Checkbox — select the row for bulk actions.
-
Edit — the pencil button. Click it to open the checklist in its own tab.
-
% Complete — a colored progress bar showing how much of the checklist is filled in.
-
Updated STIG Version Available? — yes/no flag for outdated checklists.
-
Hostname, Host IP, Host MAC, Host FQDN — the host this checklist applies to.
-
Web Site or DB Instance, Target Comment.
-
Asset Type, Title.
-
Version, Release, STIG Release Date, STIG ID, STIG Filename.
-
Filename, Filename/Path.
-
Classification, File Modified Date.
Sorting, filtering, and grouping
Section titled “Sorting, filtering, and grouping”The inventory grid supports all the standard grid operations:
-
Sort — click a column header to sort by that column. Click again to reverse the sort.
-
Filter — click the funnel icon in any column header to open the filter for that column. The active filter is shown above the grid.
-
Group — drag a column header into the grouping area (or right-click and choose Group By) to group rows by that column. Group headers show “Total Records: N”.
-
Search — type into the search box at the top of the grid to filter rows as you type.
Grid toolbar buttons
Section titled “Grid toolbar buttons”Above the grid are two toolbars.
Left toolbar — bulk actions
Section titled “Left toolbar — bulk actions”This toolbar only appears once you have selected one or more rows with the checkboxes. The available actions are:
-
Unload — remove the selected checklists from the inventory. (The files on disk are not deleted.)
-
Copy — copy the selected files to another folder.
-
Move — move the selected files to another folder.
-
Add STIG — open the Add STIG to Checklist dialog so you can add one or more STIGs from your library into the selected checklists. See chapter 12.
-
Combine — combine the selected checklists into a single file. Only available if every selected checklist has the same hostname.
-
Split — split each selected multi-STIG checklist into separate files, one per STIG.
Additional buttons appear when relevant:
-
Unload Duplicates — appears if duplicate checklists are detected. Removes the duplicates from the inventory after you confirm. The newest STIG based on file date will be the checklist that remains loaded.
-
Unload Older STIG Versions — appears if more than one version of the same STIG is loaded for the same host. Removes the older versions after you confirm.
Right toolbar — grid controls
Section titled “Right toolbar — grid controls”These five icon buttons are always available:
-
Clear Filters — remove all column filters and the search text.
-
Reset Grid — restore the grid to its default columns, widths, order, sorts, and groups.
-
Freeze Columns — choose which columns stay pinned to the left when you scroll horizontally.
-
Column Chooser — show or hide individual columns.
-
Manage Layouts — save the current arrangement of the grid under a name so you can switch back to it later. This is described in detail in chapter 8, and it is now available on every grid in the application.
-
View — a drop-down of display options for this grid. See “The View menu” below.
-
Export to Excel — save the current view of the grid (visible columns, filters, groups) to an Excel file. This button appears on the Checklists, STIG Library, STIG Revisions, and Reference Files grids. It is not shown on the two grids inside an open checklist — use the Export drop-down in the checklist editor instead (chapter 10).
The View menu
Section titled “The View menu”Click View in the right toolbar to open a small panel of display options for that grid:
-
Auto-fit row height — when on, rows grow taller so wrapped text is fully visible. When off, every row stays the same compact height and long text is clipped. Available on every grid.
-
Open details on row click — when on, clicking a row opens the details drawer for that row. Turn it off if you would rather click rows without the drawer appearing. This option is on the Checklists inventory grid and on the Grid view inside an open checklist. On the Checklists page it is hidden while the Details toggle is on, because the details are already shown as cards.
Color-banded columns and hover tooltips
Section titled “Color-banded columns and hover tooltips”Related columns are grouped together with a light background tint that covers both the header and the cells beneath it. On the Checklists inventory, for example, the host columns share one tint, the STIG columns another, and the file columns a third. The tints adjust automatically when you change themes.
On Windows and Mac, hovering over a cell whose text is too long to fit shows the full contents in a tooltip. This is enabled on the columns most likely to be truncated — Title, Target Comments, FQDN, STIG Filename, and File Path on the Checklists page, and on every column of the STIG Revisions grid.
Copying data out of a grid
Section titled “Copying data out of a grid”Right-click anywhere in a grid (Windows and Mac) for a copy menu:
-
Copy — copies the highlighted cell, or the highlighted range if you have one. Keyboard shortcut: Ctrl+C (Cmd+C on Mac).
-
Copy Range — copies the highlighted block of cells. Keyboard shortcut: Ctrl+Shift+C.
-
Copy Row — copies every visible column of the current row.
-
Copy All — copies every visible row and column.
To select a block of cells, click one cell and then hold Shift and click another. Everything between the two is highlighted, across both rows and columns, and pastes into Excel as a block. A normal click clears the highlight. Shift-clicking does not change which row is selected and does not open the details drawer.
Aggregating multi-STIG files
Section titled “Aggregating multi-STIG files”Some CKLB files contain more than one STIG. By default, these appear in the inventory as one row per STIG. If you would prefer to see one row per file, turn on the checkbox labeled “Show checklists containing multiple STIGS on one line.” (The checkbox only appears if at least one multi-STIG file is loaded.). Checklists with multiple STIGs, when listed on multiple rows, will all be highlighted the same color.
Setting a default CCI (moved)
Section titled “Setting a default CCI (moved)”Some STIG items do not have a CCI defined. If you want STIGreviewer to substitute a default CCI for those items, set it on the Business Rules page — the “Default CCI for STIG items with no CCI” box lives in the Checklist section there (see chapter 15). In earlier versions this control was on the Checklists page itself.